In healthcare, this is a document used to maintain details about the Inpatient patients, and is used to Admit and Discharge a Patient.
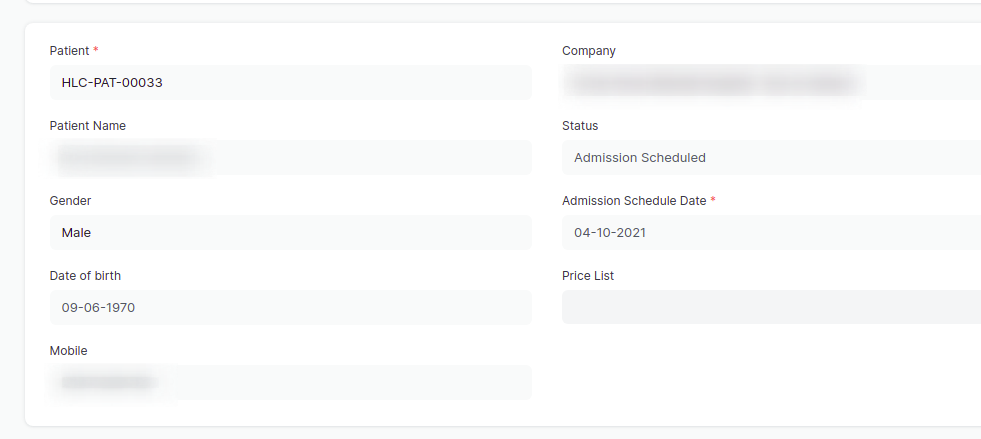
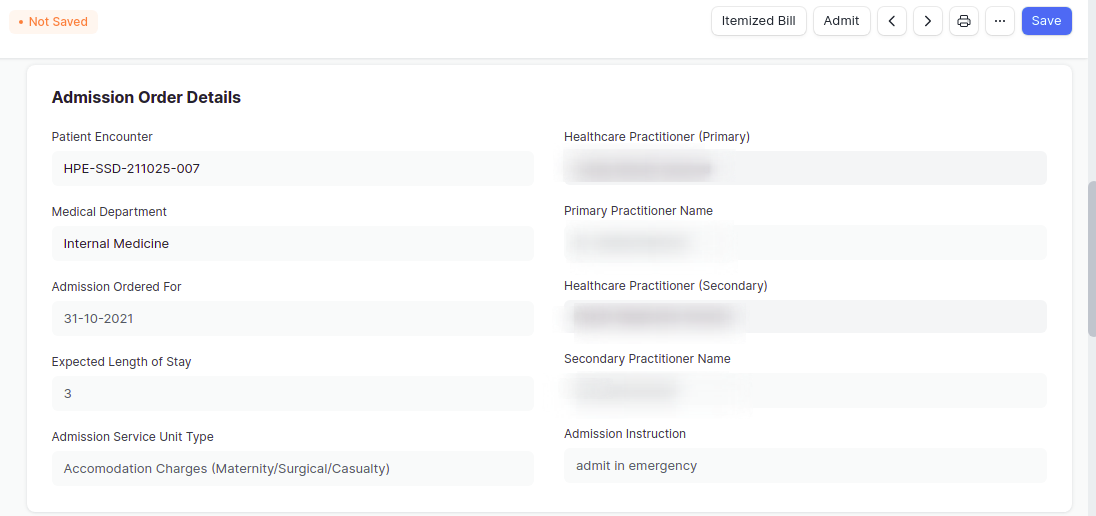
Inpatient record is created automatically with a status of Admission Scheduled when the Healthcare Practitioner presses Order Admission after clicking on Schedule Admission in Patient encounter. This is where the Inpatient Cycle starts. Inpatient record shows details about the Patient Vitals summary and Patient details, Admission Schedule Date, Status, also shows the Insurance Subscription number if the patient is an insurance patient. It also shows Admission Order details, Discharge details, Discharge Notes and other details. It is also used to maintain the record of beds in Inpatient Occupancy section for the whole period when Patient is admitted. Lastly it also keeps the record of the Consultancies in Inpatient Consultancy section.
The process of Admission till Discharge is that, Schedule Admission is done by Healthcare Practitioner in Patient Encounter, Admit is then done through Inpatient Record and beds are allocated, then cycles of Patient encounters continue and examination details are kept, then during Discharge the healthcare practitioner does Schedule Discharge in Patient Encounter, and then discharge details and notes are added, billing is done and Discharge is done by the receptionist by pressing Discharge button.
To access Inpatient record, go to;
Healthcare > Inpatient Record
Prerequisites
For Inpatient record to be created, the following should be created before;
Admitting a Patient
For admitting the Patient in the system, go to;
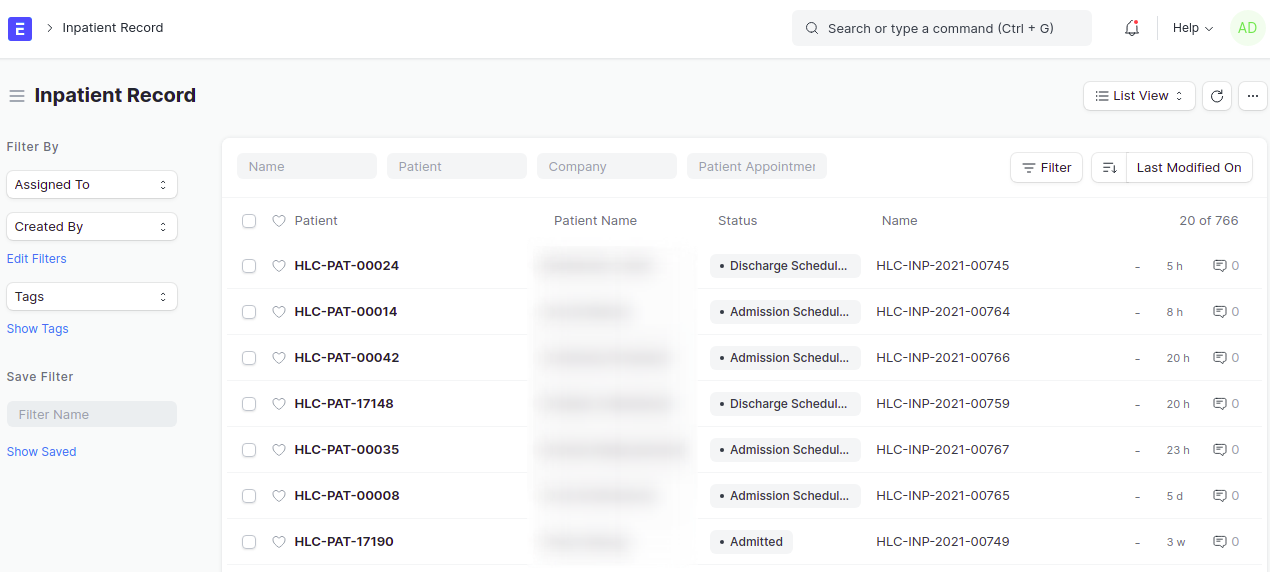
- Go to Inpatient List, and open the patient's patient record in Admission Scheduled state.
- Check the Patient details and Admission order details and Admission order notes for more information. This details are kept when the Healthcare Practitioner is Ordering for Admission
- Click on Admit button.
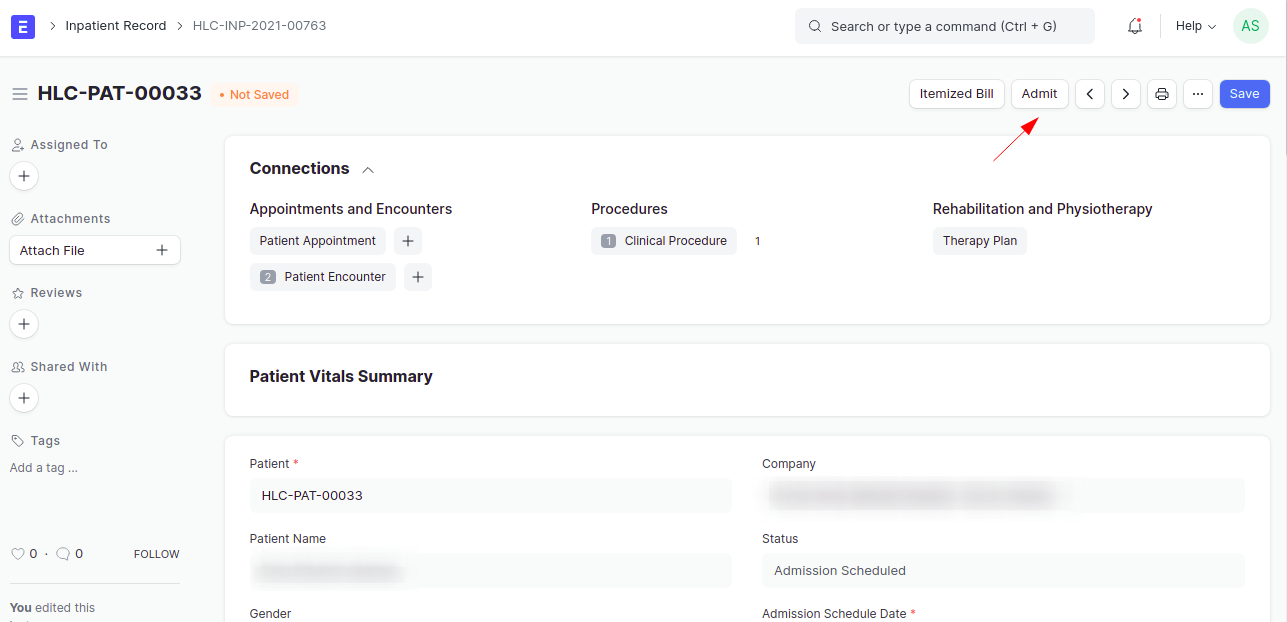
A dialog box will appear. To allocate a bed, choose the Service Unit type, and the Service Unit(beds). You can change the admitted date and time here, by default it picks up the current date and time. Note: You will only be able to select beds which are Vacant in the system. Occupied beds do not show here. Click Admit.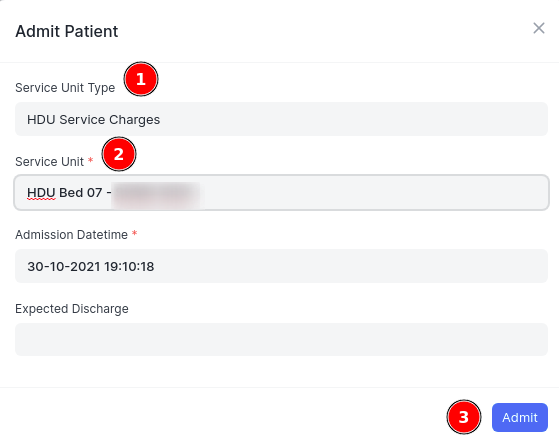
After Admitting, the admitted date and time will appear and the status of inpatient record is changes to Admitted. The allocated bed will appear in the Inpatient Occupancy table. And the bed will have the status of Occupied.
Inpatient Occupancy
This is a table which shows the Healthcare Service Units (beds) to which a person is admitted. The first bed is allocated when admit is done as seen above. The admission date time will be the check in time in the first bed.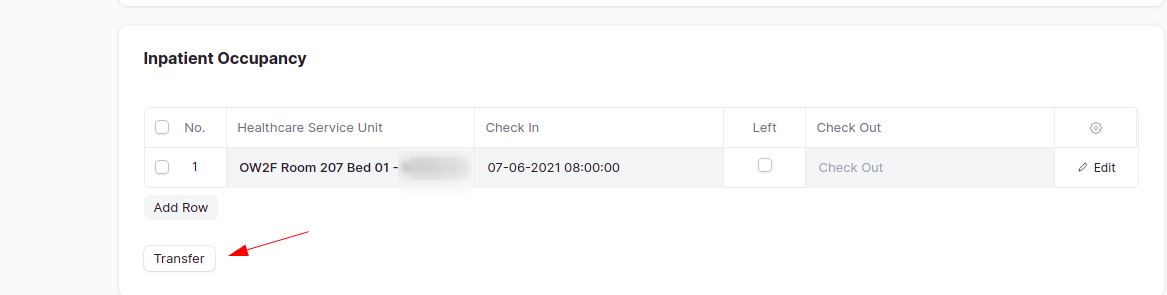
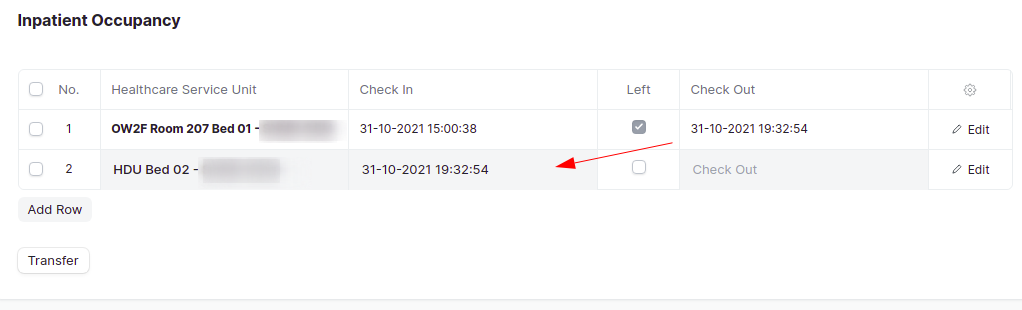
If a transfer of bed is done, then click on Transfer button to transfer the bed, after clicking on Transfer, a dialog box will appear where by select the Service Unit Type, Transfer To (bed), Check in time if needed, then click on Transfer.
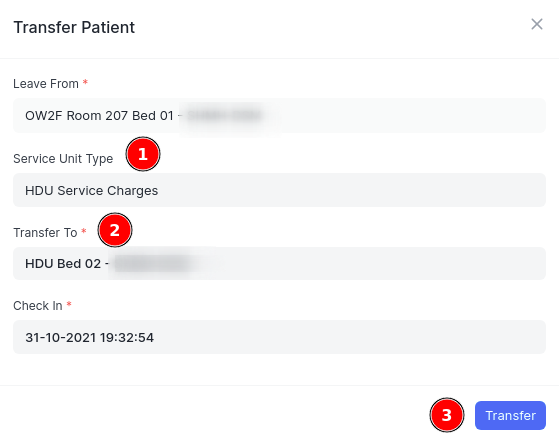
This will allocate the bed in the next row, and left will be checked together with the checkout time will appear on the bed where transfer is done.This will also vacant the bed, and can be allocated to another patient. Also it will set the prices of the bed in the amount section.
Click on Edit to see more information, then to see if the healthcare service unit is Vacant or Occupied, open the healthcare service unit in another tab by right clicking and opening the link in another tab, as shown below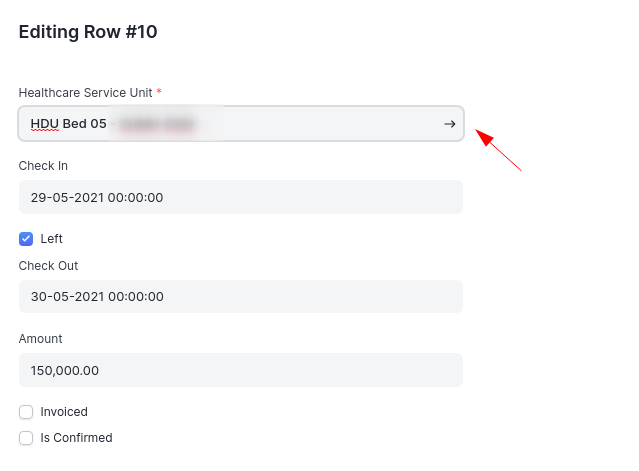
Note: Admit is supposed to be done as soon as the file is opened for the Patient, this is to avoid delay in allocation of beds. But in case there is a delay in admitting the patient, then for each day missed, a bed has to be added by pressing Transfer button and changing the check in the dialog box and not in the table to maintain consistencies until a current day is reached. See below


Automatic Allocation of beds
In order to avoid adding beds everyday, the system is automated to add a bed every day at midnight 12:00, where by if there is an initial allocation of a bed, the system will do a check out at 12:00 midnight and add another bed below it as seen below. The system will keep on adding till discharge is done.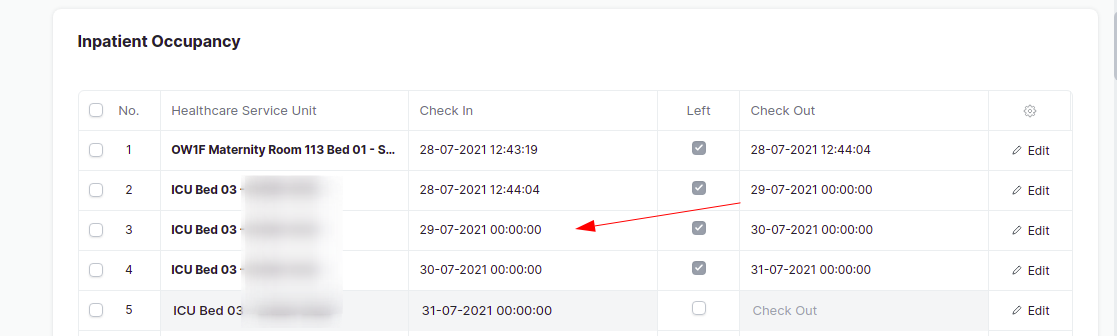
Note: if there is no any bed allocated initially or was not allocated before, then the system will not add any bed automatically. Also it not recommended to add or delete a bed, as it will bring problems in automatic allocation of beds.
Inpatient Consultancies
This is a place where by it records all the consultancies done for the admitted patient. This is automatically set when the Healthcare Practitioner submits the Patient Encounter after duplicating the Patient encounter, adds the examination details and submits it.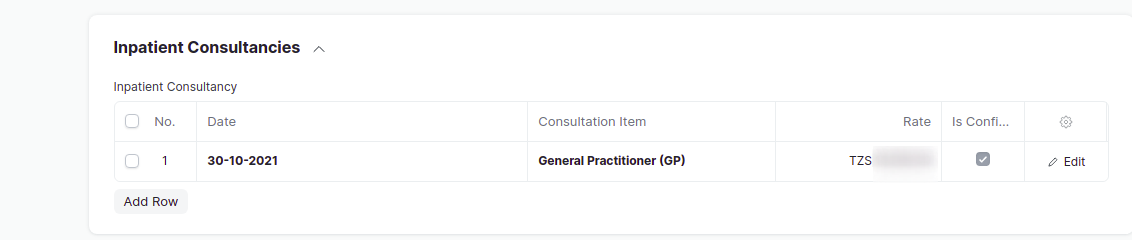
Discharging the Patient
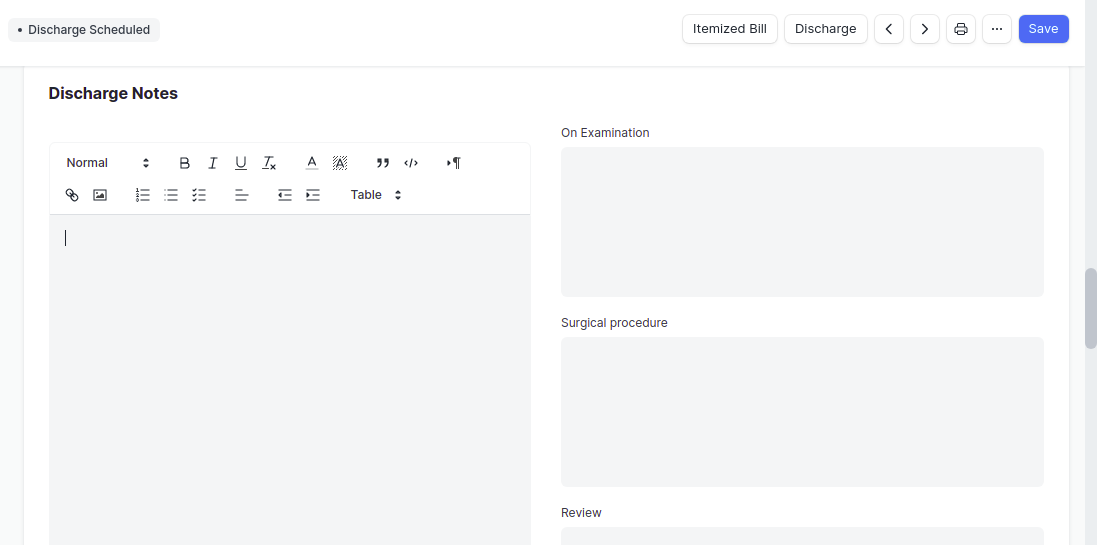
To discharge a Patient, the Healthcare Practitioner has to press on Schedule Discharge button, then add the Discharge instructions, Follow up date and Discharge notes. Then press on Order Discharge then the inpatient record for the admitted patient, will get updated with the above and the Inpatient status will change to Discharge Scheduled. 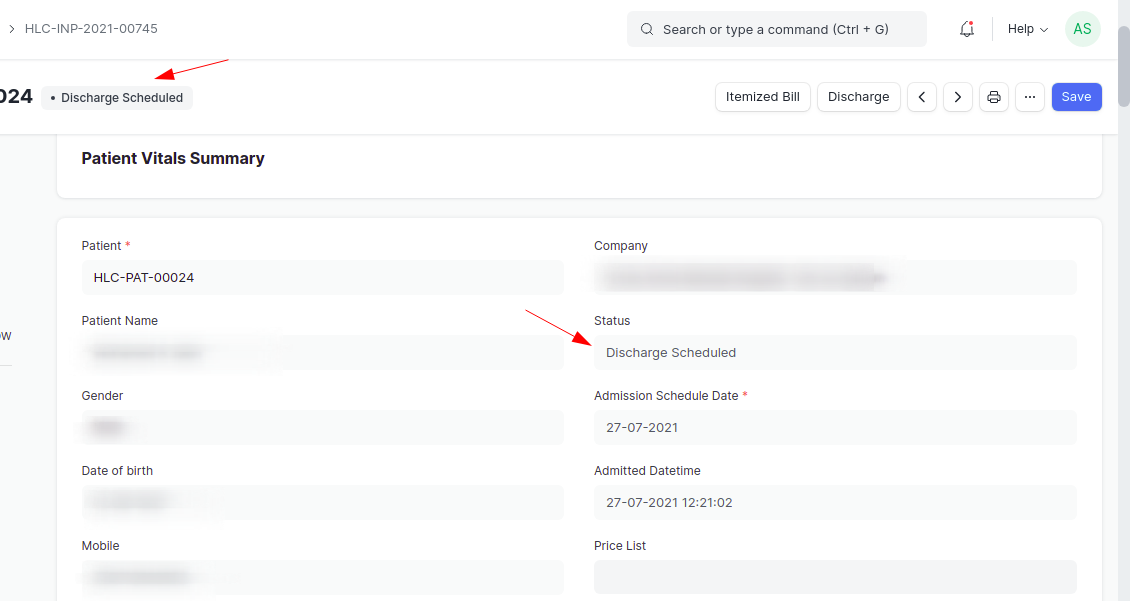
Note: Upon Schedule Discharge by the Healthcare Practitioner, the bed will become vacant, and it will mark as left and checkout time will also appear in the last bed allocated.
Then scroll down to view the Discharge details and notes written by Healthcare Practitioner.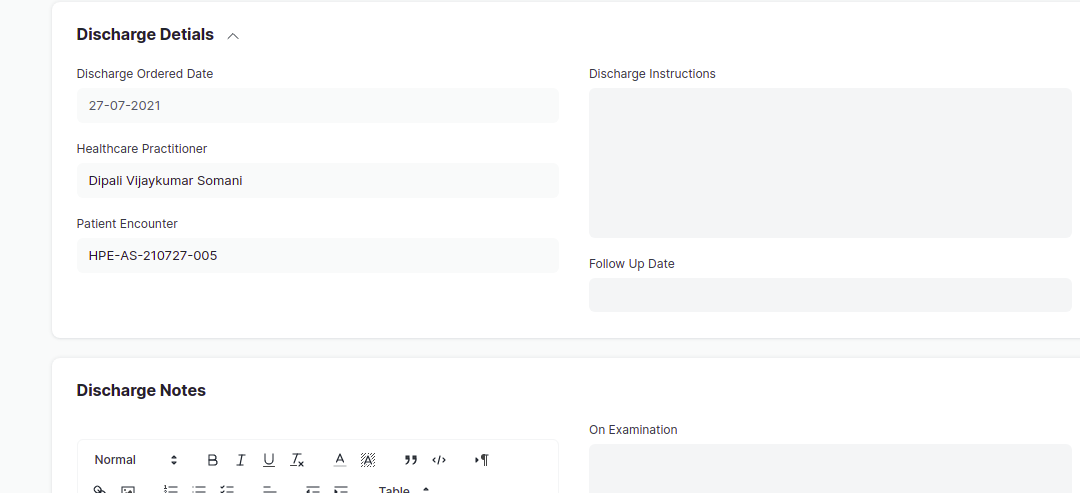
Additionally, the Healthcare Practitioner can add more details in the Discharge Notes section in the Inpatient Record. And Save it.
To Confirm the beds to be billed click on Edit in every line Inpatient Occupancy table, then check on Is Confirmed. 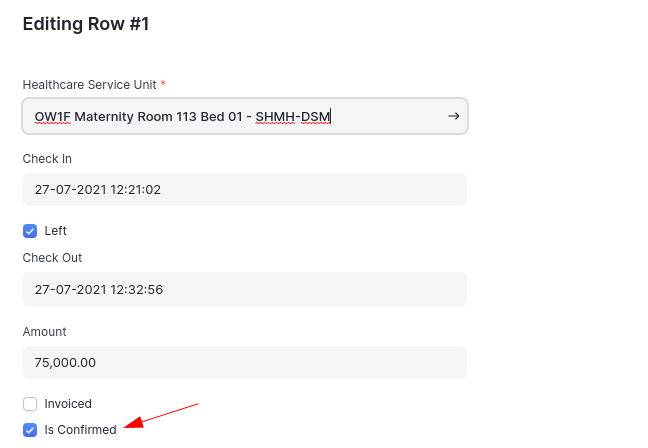
To confirm the Consultancies, check Is Confirmed in the Inpatient Consultancies table.
Note: Only the beds and Inpatient Consultancies which are Confirmed will appear in Itemized bill.
When billing is done, check the Invoiced checkbox in every item billed for cash Patients. Lastly after everything is finalized, press on Discharge button on the top of inpatient record to discharge the Patient.

Upon Discharge the status of inpatient record will be changed into Discharged. You can see all the related documents created for the patient in the Connections section.
Inpatient Statuses
- Admission Scheduled - Means the Healthcare practitioner has Ordered for Admission.
- Admitted - It shows that the Patient is admitted by the receptionist after the doctor has ordered for Admission.
- Discharge Scheduled - It implies that the Healthcare Practitioner has ordered for discharge.
- Discharged - This is when receptionist does the discharge after the Healthcare Practitioner has ordered to do discharge and after billing is done.
Related Topics
- Patient Encounter
- Sales Invoice
- NHIF Patient Claim